How to Fix a Rusted Tailgate Hinge Safely Without Causing Damage
A tailgate hinge that has turned orange, squeaks loudly, or barely moves does not always mean the entire tailgate needs replacement. In many cases, the hinge is suffering from surface corrosion, dried lubricant, and dirt packed around the hinge pin. If the metal is still solid and the hinge has not pulled away from the body, you can often restore its movement with careful cleaning, penetrating oil, and the correct grease.
The important distinction is between a stiff hinge and a structurally damaged one. A hinge that resists movement may respond to repeated lubrication, while a hinge with deep pitting, a cracked weld, a bent pin, or dangerously thin metal should be replaced or repaired by a qualified technician. Forcing either type can bend the tailgate or damage the mounting area.
This guide explains how to fix a rusted tailgate hinge on a typical truck, SUV, or van without rushing the job. You will learn how to inspect the corrosion, support the tailgate, loosen the hinge safely, remove rust, lubricate the joint, check alignment, and decide when replacement is the better option.
At a glance
- Support the tailgate before applying force to a stiff or heavily corroded hinge.
- Clean loose rust and use penetrating oil before trying to move the hinge repeatedly.
- Stop if the hinge, pin, weld, or body metal is cracked, deeply pitted, or pulling away.
How to fix a rusted tailgate hinge without causing damage
This method is intended for a hinge that is rusty and difficult to move but still attached securely. It focuses on freeing the hinge gradually rather than using a long wrench or hammer to overpower corrosion. Work with the tailgate open when possible, and keep the hinge supported so its weight does not twist the mounting points.
Tools you will need
- Work gloves and safety glasses to protect against sharp rust flakes and spray
- Wheel chocks to keep the vehicle from moving
- Jack stand, support stand, or a second person to help support the tailgate safely
- Penetrating oil formulated for rusty fasteners and hinges
- Wire brush or stiff nylon brush for removing loose corrosion
- Rags or shop towels for cleaning runoff and excess lubricant
- Small pick or flat screwdriver for clearing packed debris, used carefully
- Rust-inhibiting primer and touch-up paint, if bare metal is exposed
- White lithium grease or another lubricant suitable for automotive hinges
- Socket or wrench that fits the hinge fasteners, if adjustment or removal is required
Step 1 Inspect the hinge before trying to free it
Park on level ground, place the transmission in Park or in gear, set the parking brake, and chock the wheels. Open the tailgate only as far as it will move comfortably. Look at both hinges, including the areas where they attach to the tailgate and the vehicle body.
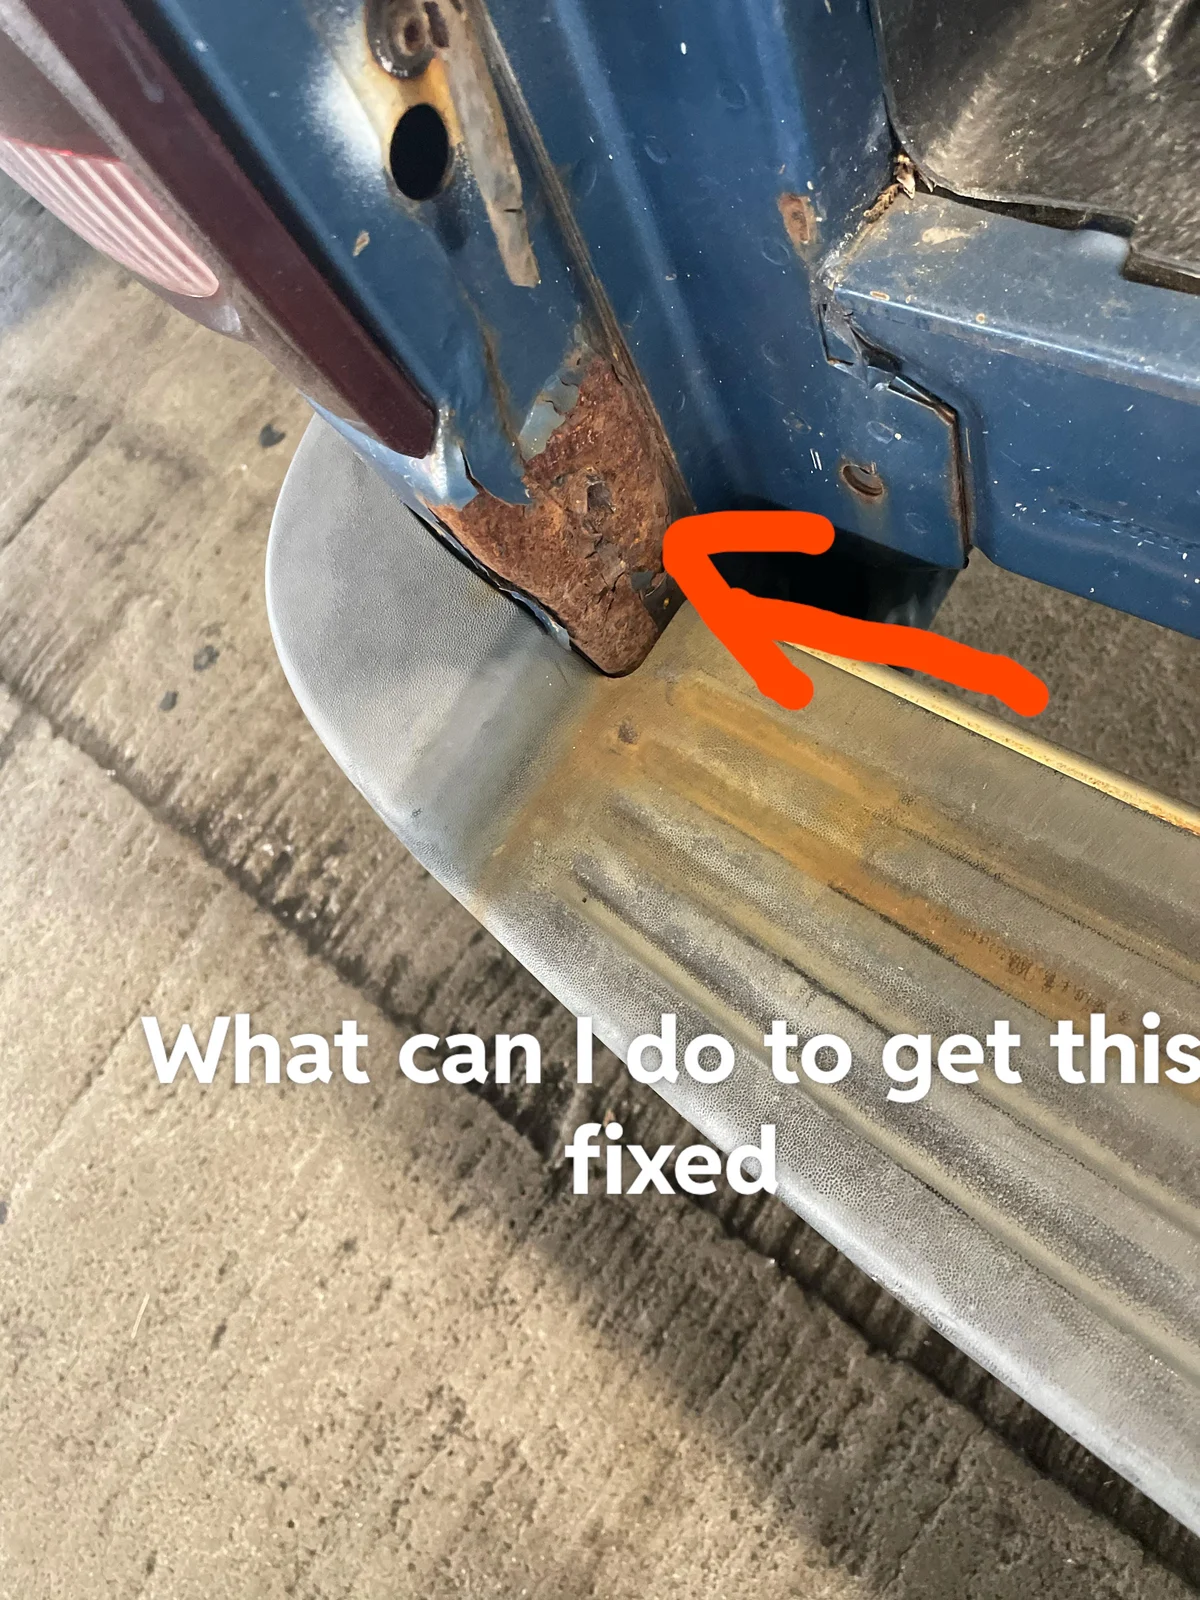
Surface rust appears as orange or brown discoloration, loose scale, or a rough coating on otherwise solid metal. More serious corrosion creates deep pits, holes, separated layers, or a sharp edge where metal has thinned. Also inspect for a hinge pin that is visibly bent, a cracked weld, missing hardware, or a mounting panel that moves when the tailgate moves.
Compare the rusty hinge with the hinge on the other side if the vehicle uses two hinges. This comparison can reveal whether the tailgate is sagging, whether one hinge is carrying unusual load, or whether the problem is mainly dirt and corrosion. Do not continue with a cleaning repair if the hinge is loose from the body or the surrounding metal flexes substantially.
Step 2 Support the tailgate and remove tension from the hinge
A tailgate can be heavier than it appears, especially when it contains trim, a backup camera, speakers, or an internal release mechanism. Have another adult hold it, or place a stable support under an appropriate strong point while the tailgate is open. Do not rely on a weak plastic trim panel or the tailgate cable alone.
If your vehicle has support cables or straps, leave them connected unless the repair procedure specifically requires removal. Check that they are not frayed and that their attachment points are sound. If the hinge is severely seized, the safest choice may be to stop here and have a repair shop support and remove the tailgate with proper equipment.
Important
Never put fingers between the hinge leaves or under the edge of a supported tailgate while someone is moving it. A sudden release can pinch fingers or let the tailgate drop.
Step 3 Brush away loose rust and dirt
Use a wire brush to clean the exposed hinge surfaces, the hinge pin ends, and the gaps where the moving parts meet. Brush in short strokes instead of scraping aggressively against nearby paint or wiring. A stiff nylon brush is a safer choice near painted surfaces, rubber seals, or electrical connectors.
Remove loose flakes, mud, and old grease with a rag. If debris is packed into the hinge, use a small pick or flat screwdriver only to lift it out of the gap; do not pry the hinge leaves apart. The goal is to expose the joint so penetrating oil can reach it, not to remove every stain or polished patch of rust.
After brushing, the hinge should have a visible moving seam and clean access around the pin. Do not be concerned if some brown discoloration remains. Firm metal with light surface rust can usually be treated, while deep cavities and crumbling edges are evidence that cleaning alone will not restore strength.
Step 4 Apply penetrating oil and let it work into the joint
Spray a small amount of penetrating oil at both ends of the hinge pin and along the seam between the moving hinge sections. Place a rag behind the hinge to catch runoff and protect nearby paint. Avoid spraying brake components, tire tread, electrical connectors, or the inside of the vehicle.
Move the tailgate only through a small, safe range while the oil is fresh. This helps draw the fluid into the joint, but do not force the tailgate past its normal travel. Apply another light coat after the first one has reached the joint and give it time to work according to the product label.
Penetrating oil is for freeing corrosion; it is not necessarily the final hinge lubricant. Many penetrating products become thin and leave limited long-term protection, so the joint should later be cleaned of excess oil and treated with a suitable grease.
Step 5 Work the hinge loose with short, gentle movements
With the tailgate supported, move it a few inches in each direction instead of swinging it fully open and closed. The first movement may be barely noticeable. Pause, apply more penetrating oil, and repeat the small movement rather than increasing force immediately.
A useful way to approach how to fix a rusted tailgate hinge is to check your progress after each stage.
If the hinge begins to move smoothly, gradually increase the range until the tailgate reaches its normal position. A successful release feels progressive: resistance decreases, the hinge stops squealing or cracking, and the tailgate no longer binds at one particular point.
Do not use a cheater bar, impact wrench, or heavy hammer on the tailgate while it is attached. Excessive force can bend the hinge, stretch support cables, break a weld, or distort the body panel. Light tapping on a removable hinge pin may be appropriate in some designs, but only after confirming that the pin is meant to be removed and that the tailgate is fully supported.
Step 6 Clean the freed joint and inspect the hinge pin
Once the hinge moves, wipe away the loosened oil, rust paste, and dirt. Brush the joint again while opening and closing the tailgate within its normal range. Look for a scored or visibly narrowed hinge pin, uneven gaps, or metal dust that quickly reappears.
A hinge pin with light staining can remain serviceable if it is straight, round, and firmly retained. A pin with a deep groove, a bend, or heavy pitting should be replaced if the vehicle’s hinge design allows it. If the pin is built into a welded hinge, replacing the entire hinge assembly is usually safer than trying to improvise a substitute.
Check the fasteners and mounting metal at the same time. A bolt that turns, a missing nut, or a hinge that shifts on its mount can cause misalignment even when the hinge itself is clean. Tighten only to the vehicle manufacturer’s specification when that information is available; overtightening can damage sheet metal.
Step 7 Treat exposed metal and apply the correct lubricant
After the hinge is clean, wipe it as dry as practical. If brushing exposed bare metal, use a rust-inhibiting primer and matching touch-up paint on the stationary areas, following the product directions. Keep paint out of the hinge’s moving seam and away from the hinge pin unless the design specifically calls for painted parts.
Apply a thin coating of white lithium grease or another automotive hinge grease to the pivot points. Work the tailgate through its normal movement to distribute the lubricant, then wipe off the excess. Too much grease attracts grit and can form an abrasive paste around the pin.
Do not substitute penetrating oil as the only long-term lubricant, and avoid products that can attack rubber seals or plastic components. If the hinge is part of a sealed or specially lubricated assembly, follow the vehicle service information instead of filling it with grease.
Step 8 Adjust the hinge only if alignment remains incorrect
Close the tailgate gently and observe the gaps around it. The latch should meet its striker without lifting, dropping, or forcing the tailgate sideways. The tailgate should sit flush with adjacent body panels, although small variations can be normal on older vehicles.
If it still sits low or the latch is difficult to engage, check for a loose hinge fastener before attempting adjustment. Mark the original position of the hinge with a pencil or removable marker. That reference makes it possible to return to the starting position if an adjustment worsens the fit.
Loosen adjustment bolts only enough to allow controlled movement, and keep the tailgate supported during the change. Make a small adjustment, tighten the hardware, and test the latch. If the hinge mount has torn metal, elongated bolt holes, or no useful adjustment range, stop rather than forcing the panel into alignment.
Step 9 Test the tailgate and confirm the repair
Remove the temporary support only after the hinge hardware, support cables, and latch are secure. Open and close the tailgate several times from different positions while standing clear of pinch points. It should move evenly without a hard spot, grinding sound, sudden drop, or side-to-side shift.
With the tailgate closed, verify that the latch fully engages and that the warning indicator, if equipped, recognizes the closed position. Pull gently on the tailgate to confirm that it is latched, but do not use enough force to deform it. Recheck the hinge after the first drive and wipe away any oil that has migrated onto painted surfaces.
Understanding how to fix a rusted tailgate hinge also means recognizing the limits of the method.
Check your result
A sound repair leaves the tailgate supported by its normal hardware, aligned with the body, and easy to open without forcing the latch. Rust may still discolor the metal, but the joint should no longer bind or shed large flakes.
When cleaning is enough and when the hinge needs replacement
Rust removal can restore movement, but it cannot rebuild metal that has been eaten away. The hinge is a load-bearing connection, so appearance is less important than thickness, attachment, and movement under load.

Signs that a cleaning and lubrication repair is reasonable
A repair is more likely to succeed when the rust is mostly on the surface, the hinge leaves remain their original shape, and the mounting points do not move. The hinge pin should be straight, the hardware should tighten normally, and the tailgate should remain aligned when supported by its cables or struts.
Minor squeaking, stiffness after rain, and orange scale around an otherwise solid pivot are common conditions for this approach. Continued lubrication and keeping road salt and mud out of the joint can slow the return of corrosion.
Signs that you should stop and seek qualified help
Do not rely on penetrating oil when the hinge has holes, severe pitting, a cracked weld, a bent hinge leaf, or a pin that is visibly loose. Stop if the tailgate drops, the body metal flexes, the latch will not hold, or the hinge pulls away from its mounting surface.
Replacement may involve removing the tailgate, supporting its full weight, disconnecting wiring, or welding a new mounting section. Those tasks can damage the vehicle or cause injury if performed without the correct support and repair equipment. A body shop or qualified automotive repair technician can determine whether the hinge, the mounting panel, or both need replacement.
How to verify the tailgate is safe after the repair
The final check should cover movement, alignment, latching, and the condition of the surrounding metal. A hinge can feel freer while still leaving the tailgate unsafe if a fastener is loose or the latch is only partly engaged.

- Open and close the tailgate slowly several times; movement should be smooth and consistent.
- Check that the gap at each side is reasonably even and that the tailgate does not scrape the body.
- Confirm that the latch clicks fully into place and that the tailgate cannot be pulled open with a gentle check.
- Inspect both hinge mounts for fresh movement, cracking paint, new metal dust, or oil leaking from a damaged seam.
- Make sure support cables, straps, gas struts, wiring, and weather seals are not pinched or stretched.
- Check for grease on the latch striker or painted bodywork and remove it where it does not belong.
Take a short, cautious drive on a smooth road only after the static checks pass. Listen for rattling and recheck the hinge and latch afterward. If a warning light remains on or the tailgate shifts during driving, do not continue using it as normal until the fault is corrected.
Common problems after freeing a rusty tailgate hinge
Most problems after this repair come from forcing the hinge, leaving abrasive rust in the joint, or confusing hinge stiffness with a latch or alignment problem. The symptoms below can help narrow down what needs attention.
| What you notice | Likely cause and next check |
|---|---|
| The hinge moves but squeaks | Old grease or remaining contamination may be present. Clean the accessible joint and apply a small amount of compatible automotive grease. |
| The tailgate still drops or sags | A support cable, strut, hinge pin, or mounting point may be worn. Support the tailgate and inspect the hardware before driving. |
| The latch is hard to close | The hinge may be misaligned, or the striker may be shifted. Check the gaps and hinge fasteners rather than slamming the tailgate. |
| Rust returns quickly | Water or road salt may be trapped in the joint, or bare metal was left unprotected. Clean, dry, prime exposed metal, and use a light protective lubricant. |
| Metal flakes continue falling | Corrosion may be deeper than surface rust. Have the hinge and its mounting area evaluated for replacement. |
What if the hinge will not move at all?
Keep the tailgate supported and repeat the cleaning and penetrating-oil process rather than increasing leverage. If the hinge remains solid after reasonable soaking and careful small movements, the pin may be seized or the hinge may be distorted. Removal may require specialized tools and a secure way to hold the tailgate, so this is a sensible stopping point for a professional inspection.
What if the tailgate became misaligned during the repair?
First confirm that the tailgate is supported correctly and that no hinge fastener or support cable is loose. If the mounting bolts shifted, return them to the marked position and test the latch again. Do not compensate for a bent hinge by forcing the latch or bending the tailgate; that can turn a small alignment issue into body damage.
What if the rust is on the body around the hinge?
Rust on the surrounding body is more concerning than light surface rust on the hinge because the body provides the hinge’s structural attachment. Clean only enough to inspect it, and avoid grinding aggressively through thin sheet metal. Bubbling paint, soft metal, holes, or a separating seam usually requires corrosion repair before the hinge can be trusted.
Frequently asked questions
These answers address common beginner concerns that are easy to miss when a tailgate hinge first begins to seize.
Can I use WD-40 instead of penetrating oil or grease?
A water-displacing spray may help clean or temporarily free a hinge, but it is not always the best penetrating product and usually is not the best final lubricant. Use a penetrating oil for loosening corrosion, then apply a compatible automotive grease after cleaning.
Should I remove the tailgate before fixing the hinge?
Usually not for light surface rust and stiffness. Removing the tailgate becomes relevant when the hinge pin must come out, the hinge must be replaced, or the mounting metal needs repair. Because the tailgate can be heavy and may contain wiring, support and removal should follow vehicle-specific service information.
Can I sand the rust off while the hinge is attached?
Yes, light brushing or careful hand sanding can remove loose surface corrosion from an attached hinge. Protect nearby paint and wiring, avoid thinning the hinge, and do not treat sanding as a fix for deep pitting or structural rust.
How often should I lubricate a tailgate hinge?
Inspect it during routine vehicle maintenance and lubricate when it begins to squeak, feel rough, or show drying grease. Vehicles exposed to road salt, coastal air, mud, or frequent water crossings may need more frequent cleaning and inspection.
Is a rusty hinge dangerous if the tailgate still closes?
It can be. A latch that closes does not prove the hinge or its mount is strong, especially if the tailgate sags, shifts, or has deep corrosion. Inspect the hinge and mounting metal before carrying loads or driving if any structural damage is visible.
Keep the repaired hinge moving and watch its attachment
Learning how to fix a rusted tailgate hinge is mainly a matter of controlling the load, removing loose corrosion, letting penetrating oil work, and using gentle movement instead of brute force. Once the hinge is free, clean away the abrasive residue, apply a suitable automotive grease, and confirm that the tailgate aligns and latches normally.
The repair is appropriate only when the hinge and its mounting metal remain solid. If you find deep pitting, a cracked weld, a bent pin, loose mounting metal, or a tailgate that drops or will not latch securely, stop using it and arrange a proper hinge or body repair. A careful inspection now is safer and usually simpler than correcting damage caused by forcing a weakened hinge.