How to Install Tailgate Lift Assist on 2003 Gmc Yukon: Key Facts
A rear liftgate that drops heavily or requires both hands to open is more than an annoyance. On a 2003 GMC Yukon, the original support system can weaken with age, and a replacement lift-assist kit may make the hatch easier to raise and safer to hold open. The job is usually manageable for a careful beginner, but the liftgate is large, heavy, and capable of causing an injury if it is unsupported.
The exact installation depends on the kit and on whether your Yukon has the standard rear liftgate or a different rear-door configuration. Most aftermarket kits use gas struts with brackets or ball studs that attach near the factory hinge area. Some kits supplement the original torsion-bar system rather than replacing every factory component, so the included instructions and vehicle-specific fitment must control the installation.
This guide explains how to install tailgate lift assist on 2003 GMC Yukon without forcing mismatched parts or relying on a failing support. You will learn how to confirm compatibility, support the hatch, install the hardware one side at a time, check for interference, and verify that the liftgate opens and stays up normally. If the kit does not clearly identify your body style, stop before drilling or bending anything and confirm the application with the manufacturer.
At a glance
- Confirm that the kit fits a 2003 Yukon’s actual rear liftgate before removing factory hardware.
- Support the liftgate with a second person and a solid prop; never trust one weak strut or the torsion bars alone.
- Test for smooth movement, secure attachment, adequate clearance, and reliable support before using the vehicle normally.
How to install tailgate lift assist on 2003 GMC Yukon
A typical lift-assist installation adds or replaces gas struts that help raise the rear liftgate and hold it open. The procedure below is written for a bolt-on kit with vehicle-specific brackets or ball studs. Do not assume every kit attaches in the same locations: compare each part with the instructions and the vehicle before tightening anything.
Tools you will need
- Vehicle-specific lift-assist kit, including its brackets, ball studs, clips, and fasteners
- Flat screwdriver or small trim tool for releasing retaining clips without damaging them
- Socket and wrench set that match the supplied fasteners
- Second person to hold the liftgate during installation
- Solid adjustable prop or other secure support rated for the liftgate’s load
- Torque wrench, optional if the kit instructions specify tightening torque
- Work gloves and eye protection
Step 1 Confirm the liftgate style and kit fitment
Open the rear of the Yukon and identify the panel the kit is meant to support. A standard liftgate swings upward on hinges at the roof. Some vehicles use split rear doors or a different rear-door arrangement, and a kit for one configuration may not fit the other.
Check the product label, application chart, and instructions for the 2003 GMC Yukon and the correct body style.
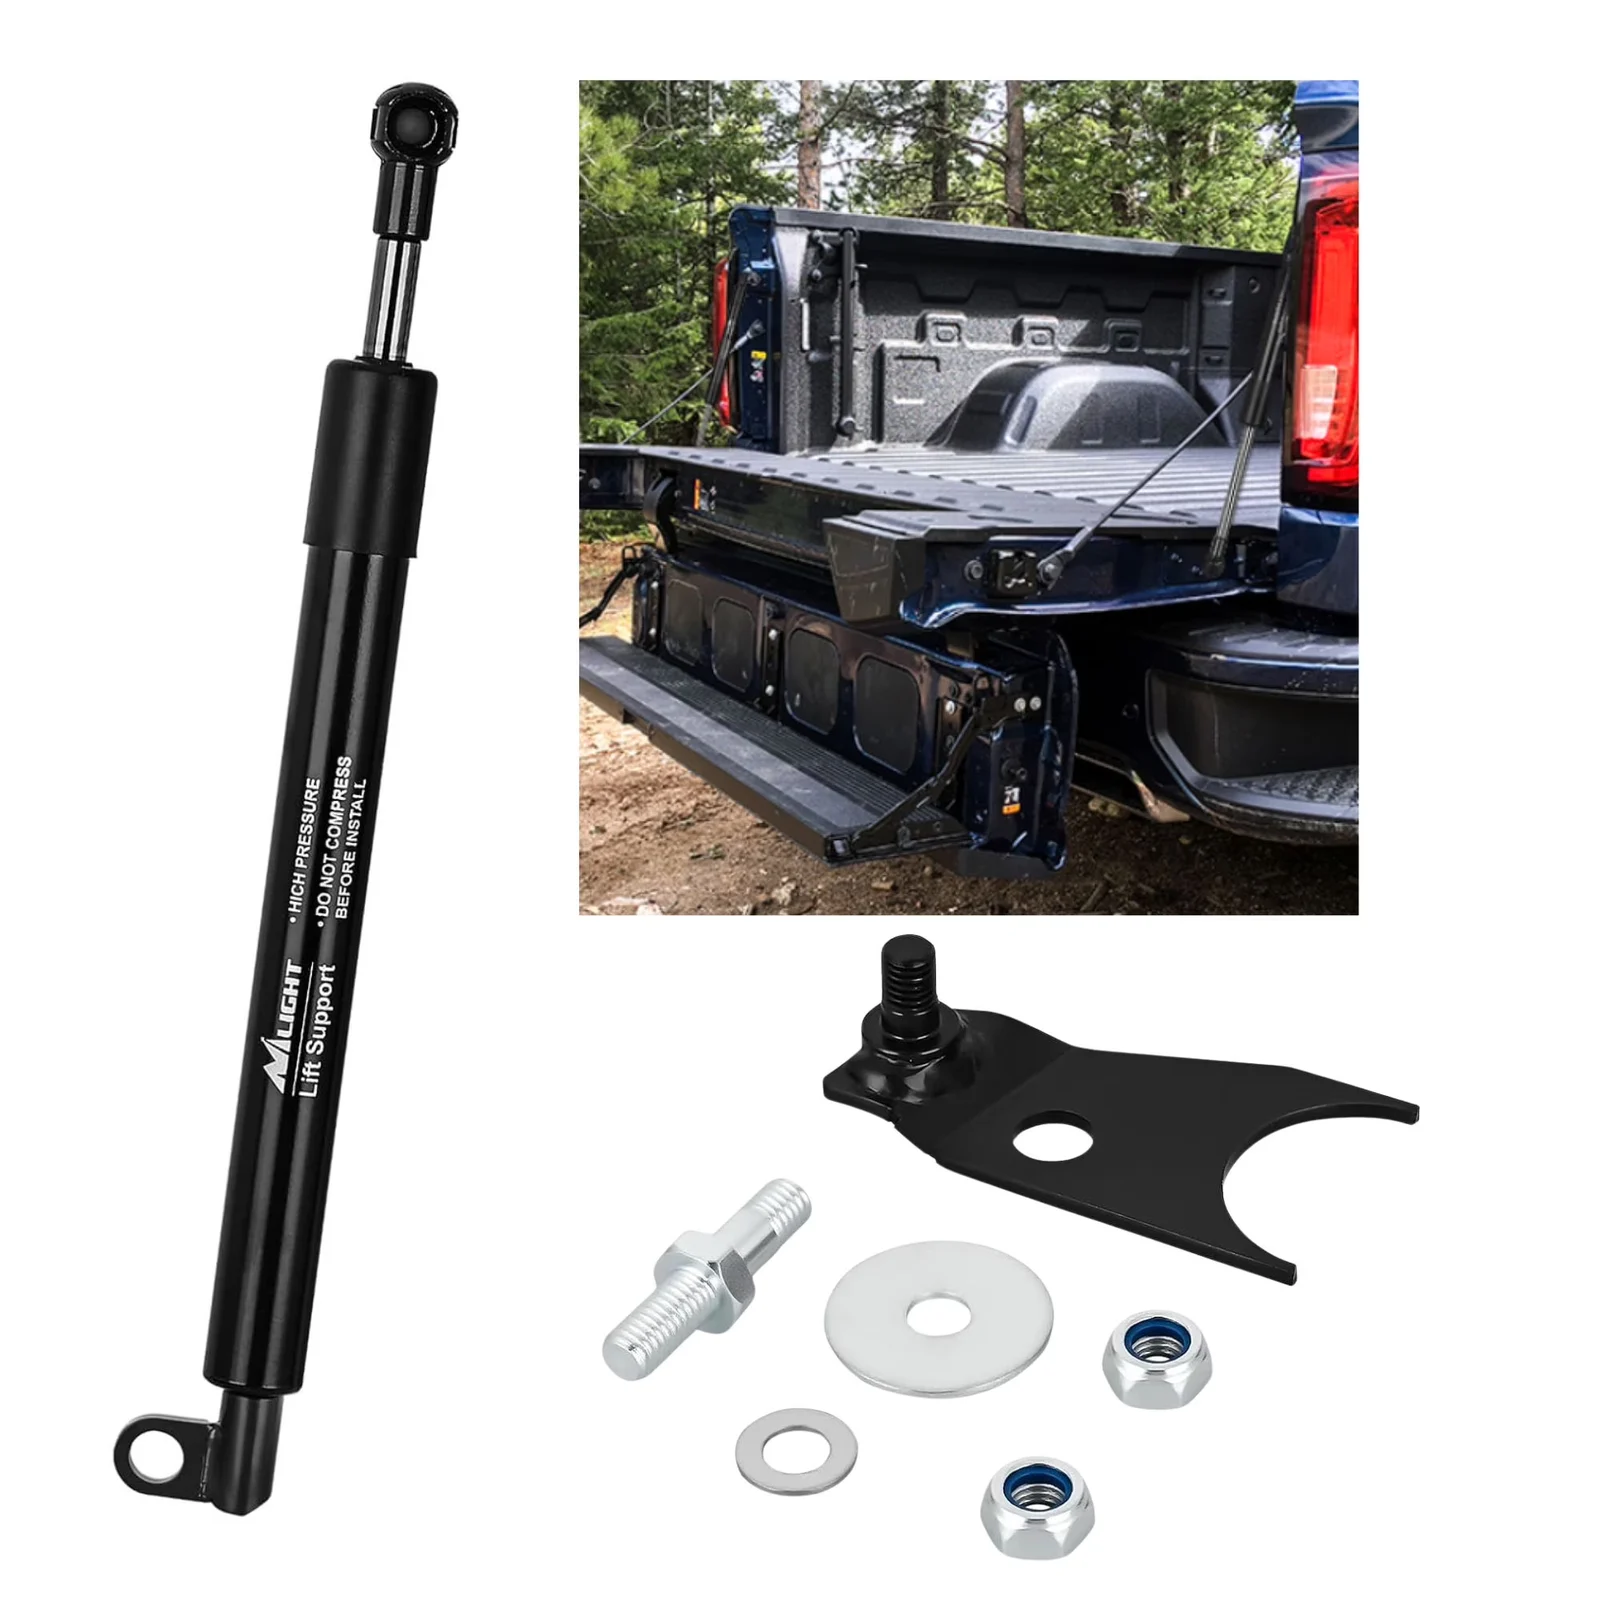
Lay out the struts and brackets beside the vehicle. Compare the left and right pieces, mounting-hole shapes, ball-socket ends, and fastener sizes with the diagrams. A left and right strut may be mirror images, and gas struts are often directional because the thicker cylinder and thinner piston rod belong at specific ends.
Look closely at the hinge area and the existing support hardware. If the metal is bent, cracked, badly rusted, or pulling away from the body, a lift-assist kit is not a substitute for structural repair. Also check that the liftgate opens freely before installation; binding hinges or a misaligned latch can overload any new assist system.
Important
Do not begin with a kit that requires drilling, unusual brackets, or forced alignment when its instructions do not clearly show the 2003 Yukon application. An incorrect strut can over-stress the liftgate, hinge, roof structure, or glass.
Step 2 Prepare a safe working position
Park the Yukon on level ground, select Park, set the parking brake, and switch off the ignition. Remove loose items from the rear opening so they cannot fall while the liftgate is moved. Avoid working in a strong crosswind, because wind can suddenly change the load on the open hatch.
Raise the liftgate to its normal fully open position. Have a helper hold it while you place a solid prop beneath a strong, non-glass portion of the liftgate or use another support method specifically recommended by the kit manufacturer. The support must prevent the hatch from dropping if a factory strut or retaining component is released.
Keep fingers away from the hinge arms, pinch points, and the area where the liftgate meets the body. Do not use the rear window, wiper arm, trim panel, or a thin interior panel as the contact point for a prop. The goal is to support the weight without pressing on glass or deforming trim.
Step 3 Inspect and record the original support arrangement
Before removing anything, photograph both sides of the liftgate support system. Record which end of each original strut attaches to the body and which end attaches to the liftgate. This reference is useful if the new kit uses some original hardware or if the instructions are unclear later.
Examine the factory struts for oil leakage, bent rods, damaged sockets, and loose mounting studs. If the kit is designed to replace the original struts, compare its extended and compressed lengths with the old parts without forcing either one. If the kit supplements the original system, leave the original components installed unless the instructions specifically direct their removal.
Check the rubber weather seal around the rear opening and the wiring near the hinges. A seal that is folded into the bracket location or a wire harness trapped under a fastener can create resistance and damage during operation.
Step 4 Remove only the hardware the instructions identify
With the helper still holding the liftgate and the prop in place, release the retaining clip on the first factory strut socket only if the kit instructions call for that strut to be removed. Many sockets use a small spring clip that is loosened slightly with a flat screwdriver; the clip normally should not be completely pried off or discarded.
Keep the tool against the clip rather than against the painted body. Once the socket is free, support the strut as it comes away and set it aside. Do not remove both original supports at once unless the liftgate is secured by a method designed to carry its full weight.
If the kit uses replacement ball studs, remove the original studs with the correct wrench while preventing the bracket or sheet metal from twisting. If a stud spins with the nut, stop and reassess rather than gripping the threaded portion with pliers and damaging it.
Step 5 Install the brackets or ball studs loosely first
Fit the first supplied bracket or ball stud to the location shown in the kit instructions. Start every fastener by hand. Leave it slightly loose until the strut can be positioned and the bracket’s alignment has been checked.
This loose-fit stage matters because a bracket can look correct while being rotated, installed on the wrong side, or placed over a weather seal. The fastener should pass through the intended hole without cross-threading. If it requires force, remove it and inspect the threads and orientation.
Repeat the process on the opposite side if the kit uses two matching brackets, but continue to support the liftgate. Keep left- and right-hand parts separated. Reversing a bracket may place the strut at an angle that looks acceptable when closed but binds as the liftgate rises.
Step 6 Attach the lift-assist struts in the specified orientation
Install the first gas strut by pressing its socket onto the ball stud or by fitting it to the supplied bracket with the specified fastener. If a socket has a retaining clip, confirm that the clip snaps fully into its groove. You should hear or feel a positive engagement; a socket that sits loosely on the ball is not installed.
Follow the manufacturer’s direction for cylinder orientation. When no clear instruction is provided, do not guess based only on appearance. Gas struts contain pressurized gas, and the piston rod’s position can affect lubrication, service life, and the force available through the liftgate’s travel.
Attach the other end to the liftgate-side mounting point. Do not use the strut to pull a bracket into alignment. If the holes do not line up with the liftgate held at the recommended angle, the part may be on the wrong side, the bracket may be reversed, or the liftgate may need to be moved slightly by the helper.
Step 7 Tighten the hardware without crushing the mounting points
After the first strut is attached and aligned, tighten its fasteners evenly. Use the torque specification supplied with the kit or the vehicle service information when available. If no torque value is provided, tighten the hardware securely without deforming a thin bracket or crushing a sleeve.
Do not apply thread-locking compound unless the instructions permit it. Some fasteners are supplied with a locking feature or a particular coating, and adding a chemical product can interfere with the intended installation. Make sure the socket retaining clips remain fully seated after tightening.
Install and tighten the second side in the same manner. Before removing the prop, gently move the liftgate a small distance while the helper controls it. Stop immediately if a bracket shifts, a strut bows, a fastener turns, or the liftgate begins to drop.
Step 8 Check clearance through the entire liftgate movement
With the prop still available and the helper controlling the hatch, lower the liftgate slowly toward the closed position. Watch both struts, their sockets, the hinges, the roof edge, the rear glass, the weather seal, and nearby wiring. The gas cylinders must not contact the body, and the rods must not scrape trim or become trapped.
A useful way to approach how to install tailgate lift assist on 2003 gmc yukon is to check your progress after each stage.
Raise the liftgate again and observe whether the struts move smoothly. A small change in angle is normal as the hatch travels, but a strut should not kink, rub, or reach a hard stop before the liftgate does. Check that the latch engages normally and that the liftgate does not contact the bumper or body unevenly.
If clearance is wrong, do not compensate by bending a bracket or forcing a socket into place. Loosen the affected hardware, compare the installation with the kit diagram, and verify that the correct side and mounting point were used. Persistent misalignment is a reason to stop and contact the kit supplier or a qualified repair professional.
Step 9 Perform a controlled operation test
Stand to the side of the liftgate rather than directly beneath it. Starting from a nearly closed position, open the hatch by hand through its full travel. It should move without a sudden jerk, grinding sound, or strong sideways pull.
The assist should help the liftgate rise; it should not launch it upward or require excessive force to control.
Let the liftgate reach its normal open position while keeping one hand available to control it. Confirm that it remains open without drifting downward. Then close it slowly and verify that the latch catches completely and that the liftgate sits flush with the surrounding body.
Repeat the open-and-close test several times, including from the normal handle location. Watch the mounting points during each cycle. A fastener that begins to move, a socket that separates, or a new creak from the roof area means the test has failed and the vehicle should not be used until the cause is corrected.
Check your result
A successful installation leaves both struts firmly seated, keeps the liftgate centered, allows smooth full travel, preserves weather-seal clearance, and holds the hatch open without manual support.
Step 10 Finish the installation and clean the work area
Once the operation test passes, verify that every supplied fastener is installed and that no original clip, washer, or bracket has been left loose inside the rear opening. Remove the prop only after the liftgate is demonstrably supported by the installed system.
Wipe fingerprints and metal debris from the mounting areas. Do not spray lubricant onto the shiny piston rods unless the kit instructions specifically call for it; many gas struts are designed to operate without added lubricant, and oily surfaces can attract dirt.
Close the liftgate and inspect the exterior from both sides. The gaps should look even, the weather seal should remain in its channel, and the latch should release and engage normally. Keep the old parts until the new installation has been confirmed, especially if the kit may need to be returned for a fitment issue.
How the lift-assist system works on this Yukon
A lift-assist kit uses gas-charged struts, leverage from their mounting points, or both to reduce the effort needed to raise the liftgate. The strut does not carry the entire hatch in every position. Its force changes in relation to the angle of the liftgate and the distance between the mounting points.
The original vehicle may also use torsion bars or factory support hardware built into the hinge system. That means a replacement kit may be intended to work with the original mechanism rather than replace it. Removing a component that appears unnecessary can make the liftgate unsafe or change how the hatch loads the hinges.
Replacement struts versus supplemental lift assist
A replacement-strut kit removes worn original gas struts and installs new ones in their place. A supplemental system may add struts, springs, or brackets while retaining the factory supports. These designs are not interchangeable, even if the parts look similar.
For that reason, how to install tailgate lift assist on 2003 GMC Yukon depends on the hardware supplied for your exact liftgate. Use the included diagram as the authority for mounting locations, orientation, and whether original supports remain in place.
Why matching the body style matters
The rear opening determines the hinge geometry, hatch weight, available mounting space, and the amount of travel required from the strut. A kit listed for a different Yukon generation, a Chevrolet sibling with different hardware, or a split-door model can have the wrong length or force rating.
Even within the same model family, equipment and rear-door configurations can vary. A product description that says “fits Yukon” is not enough by itself; confirm the year, body style, rear-door type, and any application notes before installation.
Final checks after installation
The first successful opening is not the only verification that matters. A liftgate can appear functional while a bracket is loose or a strut is contacting the body under load. Use the following checks before treating the installation as complete.
- Mounting security: Each fastener is tight, each socket is fully seated, and each retaining clip is in its groove.
- Movement: The liftgate opens and closes through its full range without binding, scraping, or sudden changes in resistance.
- Support: The hatch remains open at its normal position instead of slowly sinking.
- Clearance: Struts avoid the glass, roof edge, trim, hinges, wiring, and weather seal in both open and closed positions.
- Latch operation: The liftgate closes flush and the latch engages without slamming or excessive downward force.
- Symmetry: The left and right sides appear to carry the load evenly, with no visible bracket twist.
Recheck the mounting hardware after several normal uses. This is especially important if the kit uses newly drilled holes, rivet nuts, or brackets attached to thin sheet metal. A small amount of movement at a mounting point can become a larger failure as the strut repeatedly loads it.
Troubleshooting a lift-assist installation
Most problems come from incorrect fitment, reversed components, incomplete socket engagement, or a liftgate that already has hinge or latch resistance. Do not increase strut force or modify a bracket simply to overcome a problem that has not been identified.
| Symptom | First checks | When to stop |
|---|---|---|
| Liftgate will not stay open | Confirm strut orientation, full socket engagement, correct part number, and that the original support system was handled as instructed. | Stop if the hatch drops, a bracket flexes, or the kit appears under-rated. |
| Liftgate is difficult to close | Look for reversed brackets, struts reaching full extension, weather-seal interference, or a latch that is misaligned. | Stop if force is required or the glass and roof edge are under pressure. |
| Strut rubs the body | Check left/right placement, bracket direction, mounting holes, and clearance at both ends of travel. | Do not bend the strut or body to make it fit. |
| One side moves differently | Compare both struts and mounting points; inspect for a loose fastener or bent hinge. | Stop if the liftgate twists or the hinge area moves. |
| Socket pops off | Inspect the ball stud, retaining clip, socket, and installation depth for damage. | Do not continue operating the vehicle until the connection is secure. |
When the hatch rises too quickly
A liftgate that jumps upward can indicate excessive assist force, incorrect struts, an incorrect mounting angle, or a problem with the original support system. Keep clear of the upper travel path and verify the kit’s part number before making any adjustment.
Do not drill a new mounting location to reduce the force unless the kit manufacturer specifically provides that option. Moving the attachment point changes leverage and can overload the sheet metal or hinge.
When the hatch still feels heavy
Some resistance is normal, particularly near the closed position where the strut has less leverage. Excessive effort may indicate worn hinges, a damaged torsion bar, a misaligned latch, a dirty seal, or gas struts with the wrong force rating.
With the lift-assist parts disconnected only as directed and the liftgate safely supported, check whether the hatch itself moves freely through its hinges. If it binds without the struts attached, repair that mechanical problem instead of installing stronger assist hardware.
When hardware does not line up
Recheck the kit diagram, left and right labels, and the liftgate position. Some brackets align only with the hatch partly open, while others require the vehicle-side fastener to be installed before the liftgate-side connection.
If the supplied hardware still cannot align without bending or drilling, treat that as a compatibility problem. Photograph the parts and mounting area, then contact the supplier with the vehicle details and kit number.
Frequently asked questions
These answers address the points that most often confuse first-time installers. The kit’s instructions remain more specific than any general procedure when the two differ.
Can I install the lift-assist kit by myself?
It is safer to use a helper. One person can sometimes install a bolt-on system with a properly secured prop, but the liftgate must not be allowed to move unexpectedly while a support or bracket is disconnected.
Do I remove the factory torsion bars or original struts?
Only if the kit instructions explicitly say to remove them. Some systems replace the original supports, while others work with them. Removing the wrong component can make the liftgate drop or place excessive load on the new hardware.
How do I know whether my Yukon has the correct rear-door configuration?
A standard liftgate hinges at the roof and swings upward as one large panel. Compare that arrangement with the product application notes and installation photographs. If your vehicle has split rear doors or unusual hinges, use a kit specifically listed for that configuration.
Should I lubricate the new gas struts?
Usually no. Keep the piston rods clean and follow the kit instructions. Do not coat them with grease or penetrating oil unless the manufacturer calls for a particular product, because contamination can damage seals or attract abrasive dirt.
What if the liftgate works but does not open as high as before?
Check that the struts are the correct length, installed on the correct sides, and not reaching a hard stop early. Also inspect for interference at the brackets and hinges. Do not force the hatch beyond the travel allowed by the installed parts.
Finish with a safe, repeatable liftgate check
Learning how to install tailgate lift assist on 2003 GMC Yukon is mainly a matter of correct fitment, controlled support, and careful testing. Confirm the rear-door style, follow the kit’s mounting instructions, keep the liftgate supported while hardware is removed, and never force a bracket or strut into alignment.
After installation, verify secure sockets, tight fasteners, smooth full travel, clearances around the glass and body, and a latch that closes normally. If the liftgate drops, binds, twists, or requires unexplained force, stop using the system and resolve the fitment or structural problem before driving the Yukon. A properly matched kit should make the hatch easier to handle without compromising the hinges, body, or people standing nearby.