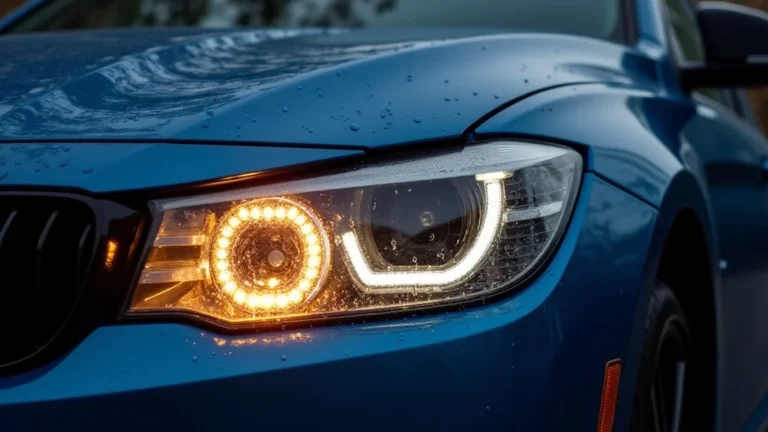
How to Install Halo Headlights: A Step-by-Step Guide
Figuring out how to install halo headlights can seem tricky at first, especially if you’re new to car modifications. People often worry about damaging their car or getting confused by all the wires. Don’t worry, though! We’re here to make things easy. This guide will break down the entire process into simple steps, so you can transform your car’s look. Get ready to explore everything you need to know to get started.
Gathering Your Gear
Before you begin, gather all the tools and parts you’ll need. This ensures a smooth and efficient project. Having everything ready saves time and frustration. It prevents you from stopping mid-project because you’re missing a screwdriver or a specific type of wire connector. Being prepared also helps you stay organized, making the entire procedure more enjoyable.
Essential Tools and Parts
This section lists everything you need to start. Think of it as your shopping list for the project. These items are generally available at local auto parts stores or online retailers. Don’t overlook any of these essentials; they are critical.
- Halo Headlight Kit: This is the main part. Choose a kit that fits your car’s make and model. You can find many different styles and colors. The kit typically includes the headlights themselves, the halo rings, and wiring harnesses.
- Screwdrivers: You’ll need a set of screwdrivers, including Phillips head and flathead, in various sizes. These are for removing screws that hold the headlights in place and securing new components. Ensure you have a good quality screwdriver set to prevent stripping screws.
- Wrench Set: A basic wrench set is useful, especially if any bolts secure the headlight assembly. Having different sizes will cover any bolt you encounter during removal and installation. Having a good set is important.
- Wire Strippers and Crimpers: For connecting wires properly, these tools are important. Use them to strip the insulation from wires and crimp connectors. Good crimping ensures solid, reliable connections, reducing the risk of electrical issues.
- Electrical Tape or Heat Shrink Tubing: These are for insulating and protecting any exposed wires. Electrical tape offers a basic level of insulation, while heat shrink tubing provides a more secure and professional finish.
Different halo headlight kits are available, including those with varying halo ring colors and light output options. Selecting the right kit is vital for ensuring a proper fit and desired aesthetic result. Choosing the right kit also means considering the size and shape of your existing headlights and whether your car requires any special adapters.
A good screwdriver set will make the job much easier. Many headlight assemblies are held in place by screws. Make sure you have the correct size and type of screwdriver. A magnetic screwdriver can be helpful to grab dropped screws.
Wrenches are essential for removing and securing bolts. A set that includes both metric and standard sizes is ideal. Choose a wrench that fits snugly to avoid stripping the bolt heads.
Wire strippers and crimpers are necessary for making secure electrical connections. They remove the insulation from wires and attach connectors. A good crimp connection is critical for safety and long-term reliability. Without them, you risk loose connections, which can lead to malfunctions.
Electrical tape and heat shrink tubing are essential for insulating electrical connections. They protect wires from moisture, abrasion, and short circuits. Proper insulation is essential for safety.
Taking Out the Old Headlights
Removing the old headlights is the first step in installing your new halo headlights. This often involves unscrewing bolts and disconnecting electrical connectors. It’s a straightforward process, but taking your time and being organized is helpful. Proper removal prepares the space for the new headlights and sets the stage for a smooth installation.
Unscrewing and Disconnecting
This is where you carefully detach your old headlights. Make sure you’re methodical, to make sure you do it right. You’ll need to locate and remove any screws or bolts holding the headlight assembly to the car’s body. After removing the screws, you’ll detach the electrical connectors. These connectors supply power to the headlight bulbs. Don’t force anything; take your time to avoid damage.
- Locating the Fasteners: The first thing is to know where the bolts and screws are. These usually are around the headlight housing. Check your car’s manual if you can’t find them right away.
- Removing the Headlight Assembly: Once all screws are removed, carefully pull the headlight assembly away from the car. It might be stuck due to clips or seals. Don’t force it; wiggle it gently until it comes loose.
- Disconnecting Electrical Connectors: Locate the electrical connectors attached to the headlight. These connectors supply power to the headlight bulbs. Carefully detach these connectors by pressing the release tabs and pulling them apart.
- Inspecting the Wiring Harness: Once the headlight is removed, inspect the existing wiring harness for any damage or wear. This is a good time to address any wiring issues. Replace any damaged wires or connectors.
Carefully locate all the screws and bolts that secure the headlight assembly. They are usually found around the edges of the headlight housing. Some cars have screws hidden behind trim pieces or under the hood. Consult your vehicle’s manual or an online guide specific to your car model if you’re having trouble finding them.
After all the fasteners are removed, gently remove the headlight assembly from the vehicle. Some headlight assemblies might be secured by clips or seals. Gently wiggle the assembly back and forth to loosen it, but don’t force it. The assembly may be heavy.
The next thing is disconnecting the electrical connectors. You will find these connectors on the back of the headlight assembly. They supply power to the headlight bulbs. Most connectors have a locking mechanism or release tab. Press the release tab while gently pulling the connector apart. Do not pull on the wires; pull on the connector itself to avoid damage.
After you remove the headlight assembly, inspect the wiring harness for any damage or wear. Look for broken insulation, corrosion, or loose connections. Now is the best time to repair any wiring issues. If you find any damaged wires or connectors, replace them before installing your new headlights.
Installing the New Halo Headlights
With the old headlights removed, you’re ready to put in the new ones. The installation typically involves connecting the new headlights, wiring the halo lights, and securing the new assembly. This is where you transform your vehicle’s look. Be patient and double-check your work as you progress.
Connecting the Headlight
In this section, you’ll attach the new headlights to your car. You’ll put the new headlight assembly into the car. Then, connect any necessary wiring, and secure the new assembly to the car body. Double-check your connections to ensure everything is working correctly. It is essential to ensure that the new headlights fit properly and are aligned.
- Positioning the New Headlights: Carefully line up the new headlight assembly with the holes and mounts on your car. Ensure it fits correctly without forcing it.
- Securing the Headlight Assembly: Use the screws or bolts that came with the new headlight or reuse the existing ones. Tighten them firmly, but don’t overtighten to avoid damaging the housing.
- Connecting the Wiring Harness: Plug in the new wiring harness to the headlight. The new harness may have connectors that match your car’s existing connectors or require splicing into your car’s wiring. Follow the instructions to match the proper wire colors.
- Testing the Headlights: Before fully finishing, turn on your car’s lights. Check that the headlights and halo rings are working. Make any needed adjustments or fix any issues before proceeding.
Before installing the new headlight assembly, make sure it lines up correctly. Gently position the new headlight in the opening. Ensure the mounting tabs align with the holes in your car’s body. Do not force the assembly into place. If it doesn’t fit, double-check the model compatibility to ensure you have the right part.
Once you verify the fit, secure the headlight assembly using the provided screws or bolts. Start by hand-tightening all screws or bolts. After that, use the correct screwdriver or wrench to tighten them. Make sure the headlight is secure but avoid overtightening. Overtightening can damage the headlight housing or strip the threads. Check the headlight alignment.
Next, connect the wiring harness to the headlight assembly. Some halo headlight kits use your car’s existing connectors. Others require you to connect directly to your car’s wiring. If you are doing direct wiring, follow the instructions carefully to make sure you match the correct wires. This may involve using wire connectors or crimp connectors to ensure secure and reliable connections.
Before finishing the installation, perform a final test. Turn on your car’s lights and check if the headlights and halo rings are working. Test the high beams, low beams, and the halo rings to ensure all the lights are working correctly. Inspect the lights for proper function. This step is important for making sure everything is connected correctly. If there are any issues, fix them before completing the installation.
Wiring the Halo Lights
Wiring the halo lights is a key part of the process, bringing your new headlights to life. This section involves connecting the halo rings to a power source. You’ll likely tap into your car’s electrical system, usually to the parking lights or another accessory wire. Following all instructions carefully is essential.
Choosing a Power Source
You need to figure out how the halo rings will get power. This depends on when you want them to turn on. Usually, people choose to have the halo rings activate with the parking lights or the headlights. You can select another power source if you prefer, like an accessory wire that’s only on when the car is running.
- Parking Lights: Connecting the halo rings to the parking light circuit means the halos will turn on whenever the parking lights are on. This is a common choice for its simplicity and the way it looks.
- Headlights: When the halo rings are connected to the headlight circuit, the halos turn on when the headlights are on. This creates a different visual effect. This is more modern and stylish.
Connecting the halo rings to the headlight circuit means the halos will activate whenever the headlights are on. This setup offers a distinct look. It may involve splicing into the headlight wiring. Consider this option if you want the halos to be active whenever your headlights are in use.
- Accessory Wire: An accessory wire provides power only when the ignition is turned on. This way, the halo rings can work independently. This can be great if you want to turn the halos on without any other lights.
- Fuse Tap: A fuse tap is a device that allows you to add a circuit to your car’s fuse box without cutting or splicing wires. It’s a clean and safe option for getting power for your halo lights.
A common power source for halo rings is the parking light circuit. This setup makes the halos light up whenever the parking lights are on. It creates a simple and clean look. This usually involves tapping into the existing wiring for the parking lights. This option is simple to set up.
An accessory wire provides a power source that activates only when the ignition is on. This setup allows the halo rings to operate independently. This may involve connecting the halo ring wiring to a fuse box or another power source that activates with the ignition. Consider this if you want to control the halos’ operation.
A fuse tap is an adapter that provides a safe and easy way to add a circuit to your car’s fuse box. You simply plug the fuse tap into an existing fuse slot and plug in the fuse. This option ensures a clean and secure power supply for your halo lights. It eliminates the need for cutting or splicing. You can find fuse taps at most auto parts stores.
Making the Connections
With a power source chosen, the next step is making the electrical connections. This involves splicing wires, using connectors, and securing the connections to ensure they are safe and reliable. Take your time, and double-check all your wiring before proceeding. Correctly done wiring is key for long-term reliability.
- Splicing Wires: Use wire strippers to remove the insulation from the wires you’ll connect. Carefully connect the halo light wires to your chosen power source wire. Ensure all connections are secure.
- Using Wire Connectors: Use wire connectors to make your connections secure and insulated. Crimp the wires inside the connectors to ensure a solid connection. Choose the correct size and type of connector.
- Securing Connections: Wrap all exposed connections with electrical tape or use heat shrink tubing. This keeps the wires safe from the elements and prevents shorts. Make sure the connections are waterproof.
- Routing the Wires: Neatly route the wires to avoid obstructions. Use wire ties or clips to secure the wires. Make sure the wires are out of the way of any moving parts or heat sources.
Use wire strippers to remove the insulation from the wires you plan to connect. This exposes the copper conductor and allows you to establish an electrical connection. When splicing wires, always twist the exposed wires together tightly. Splicing ensures a solid connection, preventing any electrical issues.
Wire connectors, such as butt connectors or T-taps, are useful for making secure, insulated wire connections. Insert the stripped wires into the connector and use a crimping tool to compress the connector around the wires. This creates a secure, reliable connection, preventing short circuits or loose wires. Correctly using connectors ensures a longer lifespan.
Use electrical tape or heat shrink tubing to seal all exposed connections and protect them from environmental damage, such as moisture and abrasion. Wrap the electrical tape firmly around the connection, overlapping the tape to make sure there are no gaps. Heat shrink tubing is the more secure choice. It provides a waterproof, long-lasting seal, which helps prevent corrosion and enhances electrical safety.
After all connections have been made, take the time to route the wires. This means arranging the wires so they are neat. Also, make sure they will not get in the way of any moving parts. Use wire ties or clips to keep the wires secure and out of the way of any moving parts or sources of heat. Properly routing the wires protects them from damage and reduces the risk of electrical problems. This will improve the car’s appearance.
Testing and Adjusting
After all the connections are made, you must test the halo lights. This ensures they function as intended. Turning on the lights and checking the wiring will highlight any problems. This also helps with aligning the headlights. Troubleshooting and making any adjustments are key. Taking the time to test and adjust will ensure a smooth finish.
- Turning on the Lights: Test all the lights on your vehicle, including the headlights, parking lights, and, most importantly, the new halo lights. Confirm that all lights turn on and off as expected.
- Checking the Wiring: Examine all the wiring connections for any loose connections or exposed wires. Confirm that everything is properly insulated and routed. Address any wiring problems.
- Troubleshooting: If any lights don’t work, review your wiring connections. Double-check all fuses and connectors. Consult the instructions. Check for compatibility.
- Aligning the Headlights: Make sure the headlights are properly aligned. This is very important for road safety. If the lights are not aligned correctly, they may not illuminate the road properly. Also, they could create glare for other drivers.
Once you are done with the wiring and securing the headlights, turn on your car’s lights. Verify that the headlights, parking lights, and, most importantly, the newly installed halo lights work properly. Test the high beams, low beams, and the halo rings. This confirms that all lights turn on and off as they should. Identify any malfunctions.
While the lights are on, do a detailed check of all the wiring connections to make sure everything is okay. Check for loose connections, bare wires, or any signs of damage. If anything looks incorrect or unsafe, fix it immediately. Make sure everything is properly insulated. Pay attention to how the wires are routed to prevent them from getting pinched or damaged.
If any of the lights do not work, it is time to troubleshoot. Recheck all wiring connections to ensure they are solid. Review any fuses and connectors. Follow the instructions that came with the halo headlight kit. It is also important to ensure compatibility with your vehicle. If you still have trouble, seek help from a professional.
Correct headlight alignment is vital for both your safety and that of other drivers. After the installation, make sure the headlights are correctly aligned. This can involve adjusting screws or other mechanisms on the headlight assembly. Proper alignment ensures that the light beam is directed correctly. If you’re not confident in this process, consider having a professional perform the alignment.
Troubleshooting Common Issues
Sometimes, things don’t go perfectly the first time. Understanding common problems can help you solve issues quickly. This section gives some examples of issues that can come up during installation and offers solutions. Knowing what to expect makes things easier, so don’t get discouraged.
- Headlights Don’t Turn On: If the headlights don’t turn on, first check the fuses and make sure they are in working order. Check the wiring connections. Make sure all the wires are securely connected to the correct terminals.
- Halo Rings Don’t Light Up: If the halo rings don’t light up, double-check your wiring. Check the connections to your power source. Confirm that the halos have a good ground connection.
- Flickering Lights: Flickering lights can mean a loose connection. Test all connections to make sure they are secure. Check your ground connection.
- One Halo Ring Doesn’t Work: If only one halo ring does not work, it could be a faulty ring or a bad connection. Test the ring with a different power source, or contact the manufacturer to see if the halo ring itself needs to be replaced.
If your headlights do not light up, the first thing is checking the fuses. Then, ensure the wiring connections are secure. Also, check that you have connected the wiring to the correct terminals. If the wiring is correct and the fuses are good, there may be a problem with the headlight assembly itself. You may want to consult the instructions or seek professional help.
If the halo rings fail to light up, focus on the wiring. Look at your connection to the power source. Verify the wiring is connected correctly. Make sure you have made a good ground connection. Grounding provides a path for the electrical current to return to the battery, and a poor ground can cause lighting problems. Double-check all of these aspects before moving to further troubleshooting steps.
Flickering lights often point to a loose connection somewhere in the circuit. Examine all the wiring connections and make sure they are tightly connected. Also, check the ground connection to make sure it is providing a good, solid connection. If you find loose connections, re-crimp or reconnect them. Improving the ground connection often solves flickering light issues.
If only one halo ring is faulty, it indicates a specific problem. You can try testing the non-functioning ring by connecting it to another power source to verify if the problem is in the ring itself. If the ring still does not light up, it may be faulty. In this case, contact the manufacturer. If it’s not the ring, look at the connections to the halo ring and the wiring related to that specific ring.
Frequently Asked Questions
Question: What tools do I absolutely need to install halo headlights?
Answer: You’ll definitely need screwdrivers, a wrench set, wire strippers, crimpers, and electrical tape or heat shrink tubing.
Question: How do I choose the right halo headlight kit for my car?
Answer: Ensure the kit fits your car’s make, model, and year. Check the kit’s specifications to confirm compatibility.
Question: Can I install halo headlights without any electrical knowledge?
Answer: While basic knowledge helps, the process is manageable if you follow instructions carefully. If you’re not comfortable with electrical work, get help.
Question: Where can I find detailed instructions for my specific car model?
Answer: Check the halo headlight kit’s manual or look for online guides and videos specific to your car model.
Question: What should I do if my halo lights aren’t working after the installation?
Answer: Double-check all wiring connections, inspect the fuses, and consult the instructions. If the problem continues, consider getting professional help.
Final Thoughts
Congratulations! You’ve successfully explored how to install halo headlights. From gathering your equipment and taking out the old headlights to connecting the new ones and wiring those halo rings, you’ve seen the whole process. By following these steps, you can safely transform your car’s look with a simple project. Remember to take your time, double-check your work, and always prioritize safety. Don’t worry if it takes a while to get it right. Now go ahead and make your car shine! You can do it!