How to Clean Hazy Headlights: A Simple, Step-by-Step Guide
Do you notice your car’s headlights looking a bit cloudy or yellowed? It’s super common! Over time, sun exposure and road debris can make headlights look dull. Figuring out how to clean hazy headlights can seem tricky, especially if you’ve never done it before. But don’t worry, it’s easier than you might think. We’re going to explore how you can make your headlights clear and bright again, without any complicated steps. Ready to get started?
What Causes Hazy Headlights?
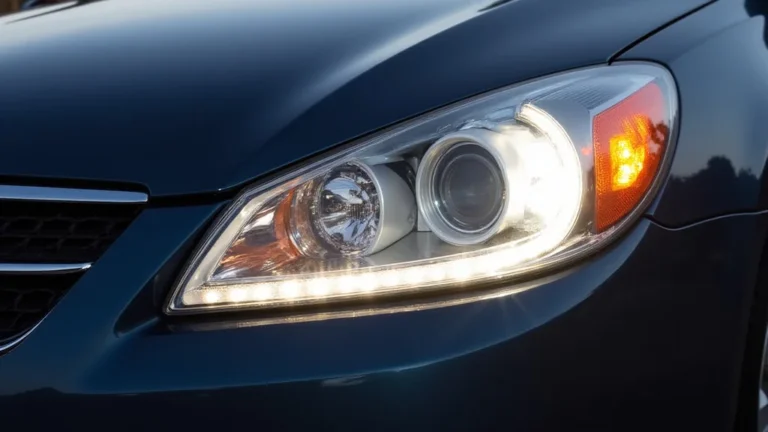
Headlights get hazy because of several factors. The main culprit is ultraviolet (UV) light from the sun. The plastic used in headlights, typically polycarbonate, degrades when exposed to UV rays. This degradation causes the plastic to become oxidized, resulting in a yellow or cloudy appearance. Also, environmental elements play a role. Road grime, dirt, and tiny particles can scratch the headlight surface, contributing to haziness. This, combined with the oxidation process, decreases the light output and visibility, making it necessary to restore them. Regular cleaning and protection can extend the life of your headlights and improve your driving safety.
UV Exposure and Oxidation
UV exposure is the primary reason headlights become hazy. Polycarbonate, a tough, transparent thermoplastic, is great for headlights but vulnerable to UV radiation. UV light breaks down the plastic’s chemical bonds, leading to oxidation. Oxidation, in simple terms, is a reaction where a substance loses electrons. In the case of headlights, this translates to the plastic becoming discolored and less clear. Think of it like a car’s paint fading in the sun. The process is gradual, starting as a slight cloudiness and gradually worsening over time. You might notice it more on older cars or those parked outdoors. Proper care and maintenance can slow down this process and extend the lifespan of your headlights.
-
The Science Behind UV Damage: UV light contains high-energy photons that damage the molecular structure of polycarbonate.
When these photons hit the plastic, they break the bonds that hold it together. This change alters the way the plastic reflects and transmits light.
The altered light reflection is what makes the headlight appear hazy. -
Oxidation and its Effect: Oxidation is a chemical reaction involving the loss of electrons.
When polycarbonate oxidizes, its surface changes, trapping dirt and causing the plastic to yellow.
The oxidation process diminishes the light output of your headlights, reducing visibility during nighttime driving. -
The Role of Protective Coatings: New headlights come with a protective coating to reduce UV damage.
This coating acts as a shield, absorbing a portion of the UV rays. However, these coatings can wear down over time due to weather exposure and cleaning.
Applying a headlight restoration kit with UV protection can help restore and maintain the effectiveness of this protective layer.
Environmental Factors and Abrasions
Beyond UV exposure, environmental factors contribute significantly to headlight haziness. Road debris, like small rocks, sand, and dust, constantly bombards the headlights while driving. This causes tiny scratches on the plastic surface. Similarly, repeated cleaning, especially with abrasive materials, can create more scratches. These scratches scatter light, reducing its intensity and clarity. Pollution and chemical exposure, such as acid rain, can also erode the headlight surface. Over time, these combined effects lead to a hazy appearance, impacting both aesthetics and functionality. Regular cleaning, using proper methods and products, can help minimize these environmental impacts.
-
The Impact of Road Debris: Small particles constantly hit headlights during driving, causing abrasions.
These tiny scratches scatter light, making headlights appear cloudy.
Driving on unpaved roads or following other vehicles closely increases exposure to debris. -
Cleaning and Abrasives: Using harsh cleaning agents or rough cloths can scratch the headlight surface.
Abrasive materials like steel wool or certain cleaning chemicals can accelerate haziness.
It’s important to use gentle cleaners and microfiber cloths to avoid further damage. -
Chemical Exposure and Pollution: Acid rain, industrial pollutants, and other chemicals can damage headlight surfaces.
These chemicals can erode the protective coating and the plastic itself, leading to haziness.
Parking in environments with significant pollution can accelerate this process.
Materials You’ll Need to Clean Hazy Headlights
Gathering the right supplies makes the process of cleaning headlights much easier and more effective. You don’t need expensive equipment; basic items work well. A quality headlight restoration kit is useful; it usually contains everything you need, from abrasive compounds to protectants. However, you can also assemble your materials separately. Using the appropriate items ensures you restore clarity without damaging the headlights. Getting prepared will ensure that you have everything you need for the cleaning process.
Headlight Restoration Kits
Headlight restoration kits simplify the headlight cleaning process. These kits include everything necessary to remove oxidation and restore clarity. They typically contain an abrasive compound, polishing compound, a UV protectant, and sometimes sanding pads. Some kits also come with a drill attachment, which speeds up the polishing process. The advantage of using a kit is that all the components are designed to work together, ensuring the best results. However, be sure to follow the instructions provided in the kit. If you plan on maintaining your car’s headlights regularly, a restoration kit can be a good investment.
-
Components of a Kit: Restoration kits usually include sanding pads, polishing compound, and UV protectant.
Sanding pads come in various grits to remove scratches and oxidation.
Polishing compounds refine the surface, and the UV protectant shields from future damage. -
Drill Attachment: Some kits provide a drill attachment for quicker polishing.
The attachment helps apply the polishing compound evenly.
Using a drill can save time and effort during the restoration process. -
Kit Brands and Options: Many brands offer restoration kits, varying in price and effectiveness.
Read reviews to select a kit that suits your needs.
Consider the level of haziness and your experience when selecting a kit.
Other Essential Supplies
Besides a headlight restoration kit, you’ll need other basic supplies. You should have painter’s tape to protect the surrounding paint from scratches during sanding and polishing. You’ll also need a soft microfiber cloth for applying and wiping off compounds and protectants. Water is essential to keep the sanding pads wet while you work. If you have a drill, ensure it’s fully charged, or have access to a power source. With these essential supplies, you’ll be well-prepared to restore your headlights efficiently. Having these ready will save you from having to stop during the process and search for a tool or product.
-
Painter’s Tape: Use painter’s tape to protect your car’s paint from scratches.
Tape around the headlight’s edges to ensure you only work on the plastic surface.
This prevents any accidental damage to the surrounding painted areas. -
Microfiber Cloths: Microfiber cloths are essential for applying and wiping off compounds.
They are soft and won’t scratch the headlight surface.
Always have a few clean microfiber cloths ready for different steps in the process. -
Water and Spray Bottle: Water is used during sanding to keep the surface wet.
A spray bottle will let you apply water evenly.
Water keeps the sanding pad from clogging and reduces scratching. -
Optional Items: Items like a drill with a polishing attachment can speed up the process.
Safety glasses are also a good idea to protect your eyes from debris.
Good lighting helps you see the progress during restoration.
Step-by-Step Guide: How to Clean Hazy Headlights
Follow these steps to clean your hazy headlights and restore clarity. Begin by preparing your car and gathering all necessary supplies. The steps include sanding, polishing, and applying a UV protectant, each of which is important for a successful outcome. Pay close attention to each step, and take your time. This detailed guide ensures you can achieve professional-looking results. Following these steps will give your car a facelift, improving visibility and making your car look better. Remember to work in a well-ventilated area and avoid direct sunlight to optimize your efforts.
Preparing Your Car
Before you start, prepare your car properly to protect the surrounding areas. Clean the headlights with soap and water to remove loose dirt and grime. Dry the headlights thoroughly with a clean cloth. Apply painter’s tape around the edges of each headlight. This protects the car’s paint and body from accidental scratches during the sanding and polishing steps. Taking the time to prepare your car carefully reduces the risk of damaging anything other than the headlights. Properly preparing ensures the cleaning process is safe and improves the final results. Be sure to tape around the headlights carefully.
-
Cleaning the Headlights: Start by washing the headlights with soap and water.
This removes any surface dirt and debris that might scratch the plastic during the cleaning process.
Use a car wash soap or a mild detergent that’s gentle on the plastic. -
Drying the Headlights: Thoroughly dry the headlights with a clean microfiber cloth.
Ensuring the headlights are dry lets you see any areas that might need extra attention during the sanding process.
It helps the painter’s tape stick more effectively. -
Applying Painter’s Tape: Protect the surrounding paint by applying painter’s tape around the headlights.
This keeps your car safe from scratches during the sanding and polishing steps.
Make sure the tape is applied smoothly and evenly to avoid any gaps.
Sanding the Headlights
Sanding is a key step in removing the haze. You’ll typically begin with a coarser grit sanding pad (usually 800-1000 grit) to remove the top layer of oxidation and scratches. Wet the headlight surface and the sanding pad with water, then sand the headlight in a consistent back-and-forth motion. Keep the surface wet to prevent scratches. As you sand, the water will help the plastic dust wash away. Once you remove most of the haziness, switch to finer grit sandpaper (1500-3000 grit) to refine the surface. The finer the grit, the smoother the finish. This sanding stage is important to completely remove all haziness.
-
Choosing the Right Sandpaper Grit: Start with coarser sandpaper to remove heavy oxidation.
Then, move to finer grits for a smoother finish.
A good starting point is 800-1000 grit, followed by 1500-2000 grit and, if necessary, 3000 grit. -
Wet Sanding Technique: Wet sanding is important to prevent scratches and reduce heat.
Apply plenty of water to the headlight and the sanding pad.
Sand in a consistent back-and-forth motion, keeping the surface wet throughout. -
Sanding in Stages: Progressively use finer grit sandpaper for better results.
Switching to finer grits gradually removes scratches and creates a clearer finish.
Each sanding stage should remove the scratches from the previous one, leaving a uniform surface.
Polishing and Protecting
After sanding, polishing removes any remaining scratches and makes the headlights clear. Apply a polishing compound to the headlight surface. Using a microfiber cloth or a polishing attachment on a drill, buff the compound in a circular motion. This will remove any light scratches and bring back the clarity of the headlight. Once polished, clean the headlight and apply a UV protectant. This protectant shields the plastic from future UV damage and helps maintain the clarity of your headlights for a long time. Applying a protectant keeps the lights from becoming hazy quickly.
-
Applying Polishing Compound: Use a polishing compound to remove fine scratches.
Apply the compound evenly across the surface of the headlight.
Buff the compound using a microfiber cloth or a polishing attachment. -
Buffing Technique: Work in a circular motion, applying light to medium pressure.
This helps to evenly remove scratches and restore clarity.
Ensure you cover the entire surface of the headlight for an even finish. -
Applying UV Protectant: Applying a UV protectant is the last important step.
This protective layer helps prevent future hazing and yellowing.
Follow the manufacturer’s instructions to properly apply the protectant.
Common Mistakes to Avoid When Cleaning Headlights
Avoiding common mistakes will help you achieve the best results when cleaning your headlights. One of the biggest errors is skipping the painter’s tape. It protects your car’s paint from scratches. Another common mistake is not using enough water during sanding. Dry sanding can create deeper scratches. Overdoing the sanding can also damage the headlights. Taking the time to avoid these common errors will significantly improve your results, helping you get the best outcome. It’s important to understand these errors to achieve the best results.
Skipping Proper Preparation
Skipping preparation steps like taping off the car and cleaning the headlights can lead to problems. Without painter’s tape, you risk scratching the car’s paint when sanding or polishing around the headlights. Not cleaning the headlights first can cause you to drag dirt and debris across the surface. This can add scratches and reduce the effectiveness of the restoration process. Time spent in preparation ensures that the process goes smoothly and that you achieve better results. Adequate preparation means less damage to your car and a better outcome. This will also give your car a better appearance.
-
The Importance of Taping: Always protect the surrounding paint with painter’s tape.
This prevents scratches during sanding and polishing.
Take your time to apply the tape carefully and ensure the edges are sealed well. -
Cleaning the Headlights Thoroughly: Wash the headlights to remove any loose dirt and debris.
This stops particles from scratching the headlights during the restoration.
Using soap and water will remove the surface contaminants. -
Checking the Surface: Take a look at your headlights to see if they’re clean and free from dirt.
Make sure that you thoroughly clean and dry the headlights before you start working.
This gives you a clear view of the damage, allowing for better sanding.
Using the Wrong Materials or Techniques
Using the wrong tools or methods can lead to poor outcomes. Using harsh chemicals or abrasive cleaners can damage the plastic. Dry sanding, which generates heat, can also cause damage. Applying too much pressure while sanding or polishing can create more scratches. Make sure to use the proper techniques. Choosing the right products and techniques is important for safely and effectively cleaning your headlights. Understanding the right process ensures your headlights remain clear and that you avoid possible damage.
-
Avoiding Harsh Chemicals: Do not use strong solvents or abrasive cleaners.
These can damage the plastic and remove the protective coating.
Use products designed for automotive headlights. -
The Problem with Dry Sanding: Dry sanding creates excessive heat and can cause scratches.
Always use wet sanding.
This keeps the surface cool and helps remove debris. -
Applying the Right Pressure: Sand and polish with the correct pressure.
Too much pressure can damage the plastic.
Use gentle pressure and let the tools and compounds do the work.
Maintaining Your Headlights After Restoration
Maintaining your headlights after restoration is critical to long-term clarity. Regular cleaning with gentle cleaners can help. Applying a UV protectant every few months also ensures your headlights stay protected from the sun. Parking your car in the shade or in a garage whenever possible will reduce UV exposure. By taking these steps, you can keep your headlights looking clear. Maintaining your headlights extends the lifespan of your restoration efforts and ensures your headlights continue to provide the best possible light. Maintaining your headlights requires minimal effort and delivers significant benefits.
Regular Cleaning and Protection
Regular cleaning is a simple yet vital part of headlight maintenance. Wash your headlights with mild soap and water whenever you wash your car. Avoid using abrasive cleaners or harsh chemicals, which can damage the plastic surface. A good car wash soap or a dedicated headlight cleaner can help. Applying a UV protectant every three to six months can keep the protective layer intact. The protectant will help block the sun’s UV rays, which are a primary cause of headlight hazing. These maintenance steps are easy and will keep your headlights clear for a long time.
-
Gentle Cleaning Products: Use mild soap and water for routine cleaning.
Avoid abrasive cleaners that can damage the plastic.
Use car wash soap or a headlight-specific cleaner. -
UV Protectant Application: Reapply UV protectant every few months to maintain the protective layer.
This shields the headlights from sun damage.
Follow the manufacturer’s instructions for the best results. -
Regular Inspections: Regularly check your headlights for any signs of hazing or damage.
Address issues quickly to prevent them from worsening.
Early detection can prevent the need for more extensive restoration efforts.
Parking and Storage Considerations
Where you park your car plays a big role in headlight maintenance. Parking in direct sunlight significantly increases UV exposure. When possible, park in a garage or under a shaded area to reduce the impact of UV rays. If you don’t have these options, consider using a car cover. Using these parking strategies will help minimize the damage from UV light and prolong the life of your restored headlights. The parking location is important, so ensure you consider this and the impact on the headlights. Also, protect your headlights and keep them clear.
-
Garage Parking: Parking your car in a garage offers the best protection from sun exposure.
This minimizes the impact of UV rays and other environmental factors.
If you have a garage, use it, particularly during the peak sun hours. -
Shaded Parking: If a garage isn’t available, park in the shade.
Look for covered areas like trees or buildings.
This will reduce direct UV exposure. -
Car Covers: A car cover can protect your headlights from UV rays.
Use a cover made of UV-resistant materials.
This creates a barrier against the sun and other environmental factors.
Frequently Asked Questions
Question: How often should I clean my headlights?
Answer: Clean your headlights every time you wash your car, or at least every month.
Question: What’s the best way to clean headlights if they’re really bad?
Answer: For severely hazy headlights, consider a headlight restoration kit, which includes sanding and polishing compounds.
Question: Can I use household cleaners on my headlights?
Answer: It’s best to avoid household cleaners. Use a car wash soap or a cleaner designed specifically for headlights.
Question: How long does a headlight restoration last?
Answer: The results from headlight restoration can last from a few months to a couple of years, depending on care and environmental factors.
Question: Will headlight restoration fix all headlight issues?
Answer: Headlight restoration can improve clarity significantly, but very deep cracks or internal damage might not be completely fixable.
Final Thoughts
How to clean hazy headlights can be a straightforward process, achievable with a little effort and the correct supplies. By understanding the causes of haziness and following the steps, you can significantly enhance your car’s appearance and safety. Remembering to prepare your car, use proper sanding and polishing techniques, and finish with a UV protectant is key to a successful outcome. Additionally, regular maintenance like washing and protecting your headlights will help maintain their clarity for years. With these tips in mind, you are ready to explore this maintenance task. Take your time, follow the steps, and enjoy the result. Your brighter, clearer headlights are just a few steps away!